
Installing an air compressor for power tool use is a critical step that directly affects the efficiency, safety, and lifespan of your tools and equipment. Whether you're outfitting a home garage, a small workshop, or a larger commercial facility, taking the time to properly plan and execute your air compressor installation can prevent costly mistakes and downtime later on. A poorly installed compressor can lead to air leaks, inconsistent pressure, and even long-term damage to your tools. This comprehensive guide will walk you through everything you need to know, from understanding why proper installation matters to a detailed step-by-step setup process. You’ll also learn about common mistakes to avoid and practical, expert-backed tips that ensure your air compressor runs smoothly and supports optimal tool performance.
Why Proper Installation Matters for Power Tool Performance
An air compressor is the heart of any pneumatic tool system. From nail guns and impact wrenches to sanders and paint sprayers, the effectiveness of your tools largely depends on the compressor's ability to deliver consistent, clean, and sufficient air pressure.
Improper installation can lead to several performance issues, including:
Pressure Drops: Incorrect hose lengths or poor fittings can cause air leaks.
Moisture Buildup: Without the right filtration and drainage, water can enter the air lines and damage tools.
Noise and Vibration: A poorly mounted compressor can become a nuisance and a safety hazard.
Increased Wear and Tear: Dirty air intake, overheating, and frequent cycling strain the compressor and tools.
Taking the time to install your compressor correctly ensures optimal pressure delivery, energy efficiency, and safer working conditions.
Looking for top-quality air compressors and parts? WholeToolBox offers a wide range of trusted brands like Ridgid, DeWalt, and Makita, along with essential parts like air filters, pressure regulators, and hoses. Shop now to get everything you need for a smooth air compressor installation and reliable power tool performance!
Tools and Accessories You'll Need for Installation
Before you begin the air compressor setup, gather the necessary tools and accessories. Having everything on hand will streamline the process and help avoid interruptions.
Essential Tools:
Adjustable wrench set
Pipe wrench
Teflon/PTFE tape or thread sealant
Screwdrivers (Phillips and flat-head)
Drill and bits (if mounting)
Level
Measuring tape
Accessories and Components:
Air hoses (appropriately rated and sized)
Quick-connect couplers and fittings
Air filter and moisture trap
Hose reel (optional but recommended)
Vibration pads or rubber feet
Power supply cord (check compressor requirements)
Mounting brackets (if wall or bench-mounted)
Make sure all fittings and hoses are rated for the maximum pressure your compressor delivers. This avoids safety risks and ensures system integrity.
Steps to Install Your Power Tool Air Compressor
Installing an air compressor for your power tool use doesn’t have to be complicated. Follow these simple steps to set up your system safely and efficiently.
Step 1; Choose the Right Location
Select a location that is:
Well-ventilated to prevent overheating
Close to your work area but isolated enough to minimize noise
On a flat, stable surface
Near a grounded electrical outlet (for electric compressors)
Away from flammable materials
Step 2: Prepare the Mounting Surface
For stationary units:
Use vibration-dampening pads to reduce noise and wear.
Bolt the compressor down if required, ensuring it's level.
For portable units:
Ensure wheels are secure and the compressor can’t roll unintentionally.
Step 3: Install Air Intake and Filters
Attach the air filter to the intake valve to prevent dust and debris from entering the motor. Consider installing an external intake silencer if noise is a concern.
Step 4: Connect to the Power Source
Electric Compressors:
Confirm voltage and amperage match your supply.
Use a dedicated circuit if required.
Never use extension cords—opt for longer air hoses instead.
Gas-powered Units:
Ensure adequate ventilation.
Store fuel safely and away from ignition sources.
Step 5: Attach the Air Hose and Accessories
Wrap Teflon tape on threaded fittings to prevent leaks.
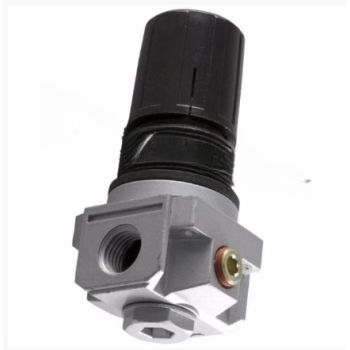
Attach a pressure regulator, water trap, and quick-connect coupler.
Run the air hose to your primary tool work area.
Use hose reels or clips to manage long lines and prevent tripping hazards.
Step 6: Test the System
Power on the compressor and let it build pressure.
Use soapy water on fittings to check for air leaks.
Adjust the pressure regulator to match your tool’s PSI rating.
Test air delivery with a tool to confirm consistent pressure.
Check out this guide on how to troubleshoot and replace table saw parts for detailed steps and tips on keeping your tools in top shape.
Common Mistakes to Avoid During Air Compressor Setup
Even a small mistake during air compressor setup can affect performance or damage your tools. Avoid these common errors to ensure a smooth, safe installation.
Using Undersized Air Hoses: Smaller diameter hoses restrict airflow, especially over long distances. Match the hose size to your compressor's CFM rating and tool demand.
Skipping the Moisture Trap: Air compressors generate moisture. Without a trap, water travels through hoses into your tools, causing rust and damage.
Overloading the Power Circuit: High-wattage compressors require dedicated circuits. Overloading can trip breakers or pose fire hazards.
Improper Ventilation: Restricted airflow around the compressor causes overheating. Keep a minimum clearance of 12–18 inches around the unit.
Ignoring Regular Inspection: Failing to re-check for leaks, moisture buildup, and pressure fluctuations can lead to long-term system failure.
Maintenance Tips to Maximize Compressor and Tool Life
Routine maintenance is essential for ensuring your air compressor and pneumatic tools perform reliably and last for years. A well-maintained compressor operates more efficiently, reduces energy consumption, and protects your investment from premature failure.
Daily Maintenance:
Drain the Tank: Moisture naturally collects in the tank during use. Draining it after each session prevents internal corrosion and keeps the air dry for your tools.
Check Oil Levels: For oil-lubricated models, maintaining the correct oil level is vital to prevent overheating and component wear.
Inspect Hoses: Look for cracks, bulges, or leaks, which can lead to pressure drops or sudden hose failure during operation.
Weekly Maintenance:
Clean or replace the air intake filter to ensure unrestricted airflow and protect the motor.
Tighten all fittings and connections to prevent air leaks.
Test the pressure relief valve to verify it's working properly as a safety precaution.
Monthly Maintenance:
Inspect the drive belt (if equipped) for signs of wear or slack.
Lubricate moving parts according to the manufacturer’s guidelines.
Check the automatic shutoff to ensure it activates at the designated pressure level.
Implementing these steps regularly helps extend the lifespan of both your compressor and tools while reducing costly downtime.
Check out this article power tool maintenance to keep your equipment running smoothly and efficiently.
Installing an air compressor may seem intimidating at first, but with a structured approach, the right tools, and a bit of planning, it becomes a manageable and rewarding project. Proper installation not only ensures the optimal performance of your power tools but also prolongs the life of your equipment and enhances safety in your workspace.
Looking for reliable air compressor parts? WholeToolBox has you covered with top-quality products like pressure switches, air filters, and drain valves from trusted brands like Dewalt, Makita, and Bostitch, all in one convenient place!
FAQs
What type of hose is best for air-powered tools?
Use a high-quality, kink-resistant air hose with the correct diameter for your tools. For most power tools, a 3/8" hose balances flexibility and airflow well.
What size air compressor do I need for power tools?
Match the compressor’s CFM and PSI to your tool’s requirements. Light tools need 2–4 CFM; heavier ones may need 5–10+. Choose a compressor with at least 25% more CFM than required.
Can I use one air compressor for multiple power tools?
Yes, but make sure your compressor's CFM rating matches or exceeds the combined demand of the tools you’ll use. Using a splitter or manifold with proper regulators can help distribute air effectively.


Validate your login