Home Gardening Lessons: Common Mistakes and How to Avoid Them
Home gardening often starts with enthusiasm, but the results don’t always match the effort. Many gardeners face issues like uneven growth, weak plants, poor soil performance, or constant replanting without understanding the real cause behind it. Most of these problems don’t come from lack of care, but from a few overlooked basics in planning and setup.
Once you get the basics right, everything in your garden grows better. Today, home gardening is much more efficient because of better awareness around sunlight patterns, soil preparation, smart layout design, and proper transplant handling.
In this blog, we cover these core areas in detail, including how to read sunlight correctly, avoid layout mistakes, improve soil health, and reduce transplant shock for stronger, healthier plant growth.
Understanding Sunlight Patterns Before Planting Your Garden
Sunlight is one of the most critical factors in garden performance. The amount and intensity of light a space receives change significantly across seasons due to the shifting angle of the sun. In summer, sunlight is more direct and intense, while winter light is weaker and shadows stretch much longer. Because of this, a location that seems sunny in July may become partially shaded in colder months.
Most lawn grasses and general garden plants require at least 6 hours of direct sunlight daily, while partial-shade plants can tolerate around 4 to 6 hours. Choosing plants without matching them to available light often leads to weak growth, uneven coverage, or thin, patchy areas in the lawn.
How to Properly Evaluate Sunlight in Your Garden
Instead of guessing, observe your space throughout the day. Track how sunlight moves across different areas in the morning, midday, and afternoon. You can sketch a simple yard map and mark sunny and shaded zones at different times. Overlapping these observations reveals true full-sun areas.
Digital tools and apps can further improve accuracy by simulating sun movement for your exact location. Even simple techniques, such as noting shadow movement every hour using a fixed object, can provide reliable insight.
Explore Smart gardening for homeowners: How technology is transforming lawn and garden care to understand how technology is improving lawn and garden care
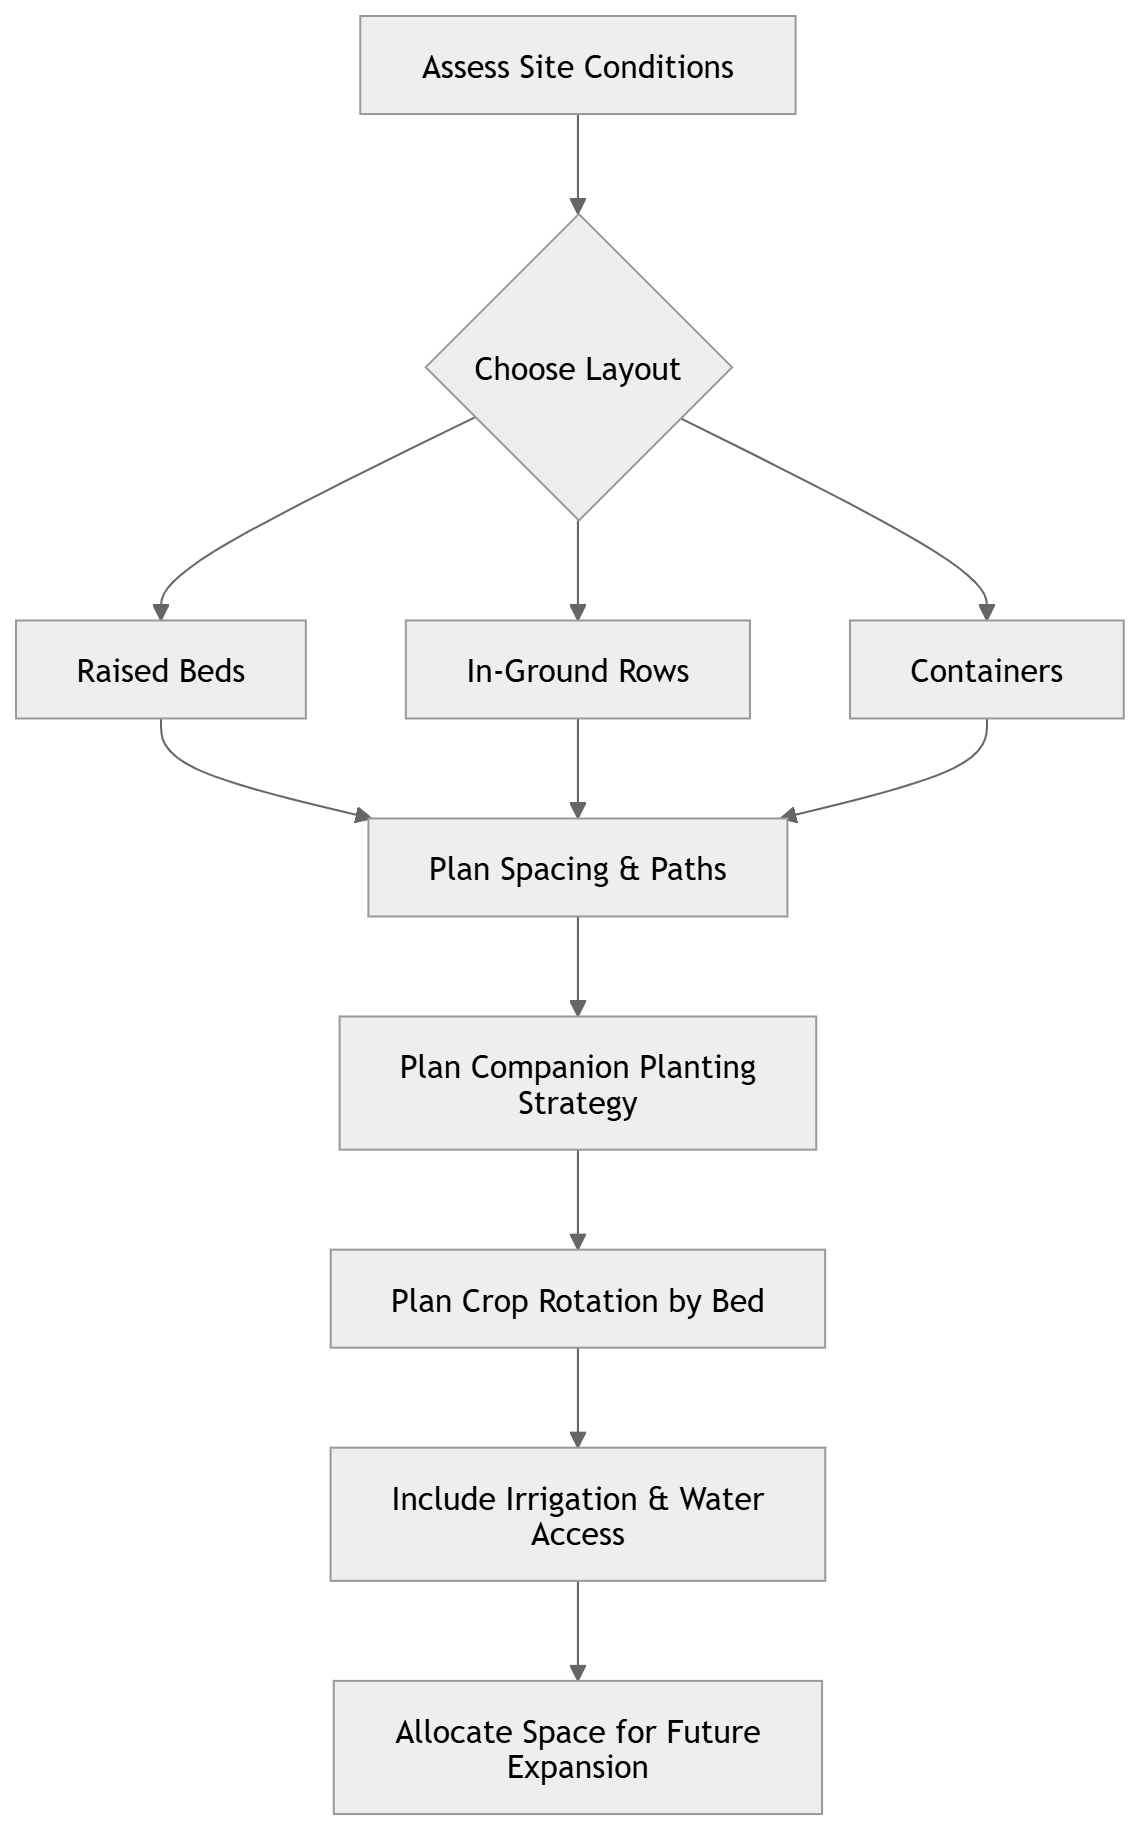
Avoiding Garden Layout Mistakes That Limit Long-Term Growth
A well-planned garden layout improves plant health, reduces maintenance effort, and supports long-term productivity. One of the most common mistakes is overcrowding plants. When plants are too close together, they compete for nutrients, water, and sunlight, which weakens overall growth and increases disease risk. Below are the key layout considerations:
-
Proper Spacing and Access Paths: Each plant needs adequate space based on its mature size. Narrow or missing pathways can make watering, pruning, and harvesting difficult. Functional paths between beds also help prevent soil compaction caused by foot traffic.
-
Plant Grouping and Compatibility: Some plants support each other’s growth, while others compete. Mixing herbs and flowers with garden plants can help attract pollinators and beneficial insects. However, companion planting should be seen as supportive, not a replacement for proper care and rotation.
-
Crop Rotation for Soil Health: Growing the same plant type in the same location year after year increases pest buildup and nutrient depletion. Rotating plant families annually helps maintain soil balance and reduces disease pressure. Heavy nutrient users should be followed by lighter feeders or soil-enriching plants.
-
Planning Irrigation Early: Water systems should be designed before planting begins. Grouping plants by water needs makes irrigation more efficient. Drip systems or soaker hoses reduce water waste and limit leaf moisture, helping prevent fungal problems.
-
Planning for Future Expansion: Avoid filling every inch of space immediately. Leaving flexible areas allows for expansion, redesign, or seasonal adjustments. Modular bed design is especially useful for long-term adaptability.
The Importance of Proper Soil Preparation for Healthy Plants
Healthy soil is the foundation of productive gardening. Ideal soil is loose, nutrient-rich, and rich in organic matter that supports strong root development and active microbial life. Below is a clear step-by-step process for effective soil preparation.
Step 1: Soil Testing
Before planting, soil testing provides critical insight into nutrient levels and pH balance. This helps prevent over-fertilization and identifies the specific amendments required. Most plants grow best in slightly acidic to neutral soil conditions.
Step 2: Adjusting Soil Chemistry
Based on test results, the soil may require pH correction. Acidic soil can be improved with lime, while overly alkaline soil may require sulfur or other organic amendments. Applying the correct amount is essential to avoid nutrient imbalance.
Step 3: Adding Organic Material
Compost is one of the most effective soil amendments. It improves soil structure, enhances water retention, and gradually increases fertility. Regular additions help maintain long-term soil health. Well-decomposed organic matter is preferred, as fresh waste materials can disrupt nutrient availability.
Step 4: Improving Structure and Drainage
Soil should be loose enough to allow proper air and water movement. Compacted soil restricts root growth and increases the risk of waterlogging. Adding organic matter and avoiding work in overly wet conditions helps maintain good soil structure. In severe cases, deeper loosening or drainage improvements may be necessary.
Step 5: Timing Soil Preparation
The best time to improve soil is during fall or early spring. This allows amendments to integrate naturally before the planting season begins. Covering soil or planting cover crops during off-seasons helps maintain fertility and prevent erosion.
Preventing Transplant Shock and Improving Plant Survival Rates
Transplant shock can be minimized through proper preparation, careful handling, and correct post-planting care. Below are the key practices to ensure healthy establishment and higher plant survival rates.
-
Hardening Off Plants: Seedlings should be gradually introduced to outdoor conditions over 7 to 14 days. Start with short exposure in sheltered, shaded areas and slowly increase sunlight and outdoor time. This process strengthens plant tissues and reduces stress when they are finally transplanted.
-
Careful Handling of Roots: Roots are highly sensitive during transplanting. Always keep them moist and avoid prolonged exposure to air. If roots are circling inside containers, gently loosen them before planting to encourage outward growth.
-
Correct Planting Technique: Plants should be placed at the same depth they were growing previously, unless otherwise recommended. Soil should be gently firmed around the roots to remove air pockets, followed by deep watering to stabilize the plant.
-
Timing Matters: Cool-season crops can be planted earlier, while warm-season crops should only go into the ground after frost risk has passed. Weather conditions such as cloudy days or evenings are ideal for transplanting because they reduce stress.
-
Watering Strategy After Transplant: New plants require consistent moisture without oversaturation. Overwatering can suffocate roots, while underwatering leads to wilting. Monitoring soil conditions daily during the first week is essential for successful establishment.
-
Reducing Additional Stress Factors: Avoid heavy fertilization immediately after transplanting. Instead, allow plants to establish first. Protect young plants from pests, strong winds, and extreme sunlight when necessary.
Garden Planning Workflow: Below is the garden planning workflow, including layout selection, spacing, irrigation, and expansion planning.
Summary: Key Takeaways for Smarter Home Gardening Decisions
When you understand how sunlight affects plant growth, prepare your soil properly, plan your layout, and handle transplants with care, your garden becomes healthier, more productive, and much easier to manage. Most common gardening problems can be avoided simply by focusing on these basics from the very beginning instead of trying to fix issues later.
Key Takeaways
-
Match plants to the right sunlight conditions to avoid weak or uneven growth
-
Plan garden layout early to prevent overcrowding and improve access
-
Prepare soil properly using testing and organic matter for long-term fertility
-
Rotate crops to maintain soil health and reduce pests and diseases
-
Design irrigation before planting to ensure efficient and consistent watering
-
Harden off and handle transplants carefully to improve survival rates
Shop high-quality lawn equipment parts at WholeToolBox. Find durable lawn sweepers, mulching kits, mulch plugs, and striping kits from trusted brands like EGO, Murray, and Exmark to keep your equipment running efficiently.
References:
https://ngb.org/garden-podcasts/
https://www.usda.gov/about-usda/general-information/initiatives-and-highlighted-programs/peoples-garden/gardening-advice
FAQs
What is the best time of day to water a lawn?
Early morning is the ideal time to water a lawn because it reduces evaporation and allows grass blades to dry during the day. This helps maintain healthy turf and lowers the risk of fungal growth.
How often should I fertilize my lawn?
Most lawns benefit from fertilizing 2 to 4 times per year, depending on grass type and climate. Seasonal feeding in spring and fall is typically most effective for promoting steady growth and strong root development.
What is the ideal mowing height for a healthy lawn?
Most lawns perform best when kept at a height of 2.5 to 3.5 inches. This range supports stronger roots, better moisture retention, and fewer weeds. Cutting the grass too short can weaken the lawn and make it more prone to stress, weeds, and heat damage.
|
Disclaimer: This blog is for general informational purposes only. Gardening results may vary based on local conditions, soil type, climate, and plant selection. |


